Eureka

According to legend, the ancient Greek mathematician Archimedes was hired by the king to determine if a crown is pure gold or just covered by gold. Legend says that while taking a bath, Archimedes suddenly realized that by measuring the amount of water displaced by an object (crown), one can calculate its density, and hence its purity.  In his excitement, he jumped our of the tub, ran through the streets toward the palace, wet and naked, shouting “Eureka!” (“I have found it” in Greek).  He eventually developed Archimedes' principle, which states elegantly: Buoyancy = weight of displaced fluid.

The story becomes legend because it reveals an often-overlooked aspect of problem solving: remove the safeguard of hard thinking and let the unexpected wisdom of intuition drive, one might be stricken by the light of sudden enlightenment.

While it is challenging to define the intuition, we know that they not only exist, but sometime play important roles in our successful projects, and many other efforts. Some of the attributes of intuition include: collective consciousness, egoless, stressless state of mind allowing free thinking, gift from a higher power, etc.

Intuition and reason, seemly opposing forces, are actually complementary to each other.  We nurture our instinct with all information available, all our intellectual efforts and let it blossom. We walk with 2 legs: intuition and reason, of them I do not know which is left or right.

We live in a wired world of hardware, software and emotion. We may not be software developers by profession, but almost all of us, at one point or another, are users of some software. We all experience the WOW moment when we see clever design or pleasantly surprised features, but more often than not, we sigh with complain: “Why do not they design better?!”

Those under-delivered software packages lack one or both of intuition and reason.  Software is a distance dialog between developers and users, who most likely never meet each other. But the needs of users are met by developers through intuition and intelligent efforts. Users acquire advanced features. Developers have to switch roles of programmers and users (to design how they use the eventual software) to conduct a successful remote “conversation”.

Making simple things complicated is easy, because one does not have to think hard; while making complicated tasks as simple as Google search or Archimedes' principle is very difficulty and requires strong intuition. That is art!

“Simplicity is the ultimate sophistication.” Leonardo da Vinci said 500 years ago. Let all of us, users and developers, embrace simplicity in life and work, and have more “Eureka!” moments!

Casing Wear Series - 9: Contact Pressure Threshold (Part 2)

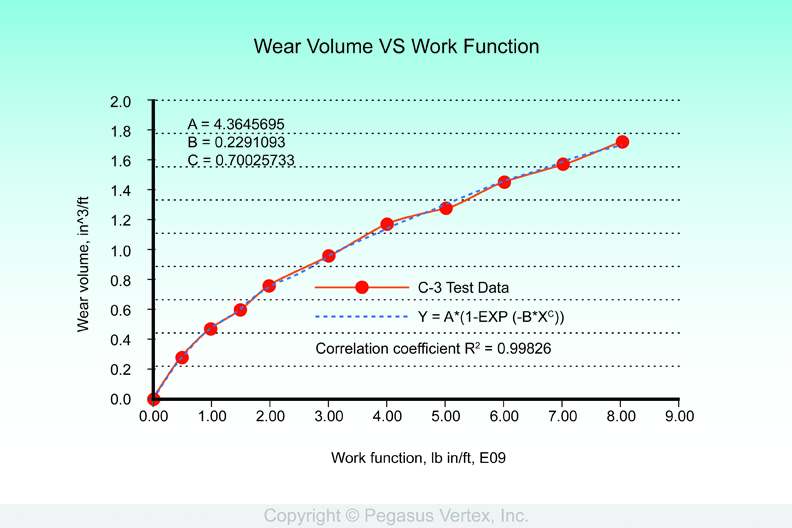
Contact pressure threshold can be demonstrated using a plot of casing wear test data such as that shown in the upper curve in Figure 1. First, the plot of wear groove depth vs. elapsed test time is transformed to a function of wear groove volume vs. work function, as is shown in Figure 1.

Figure 1: Wear Groove Volume vs. Work Function

Figure 1: Wear Groove Volume vs. Work Function

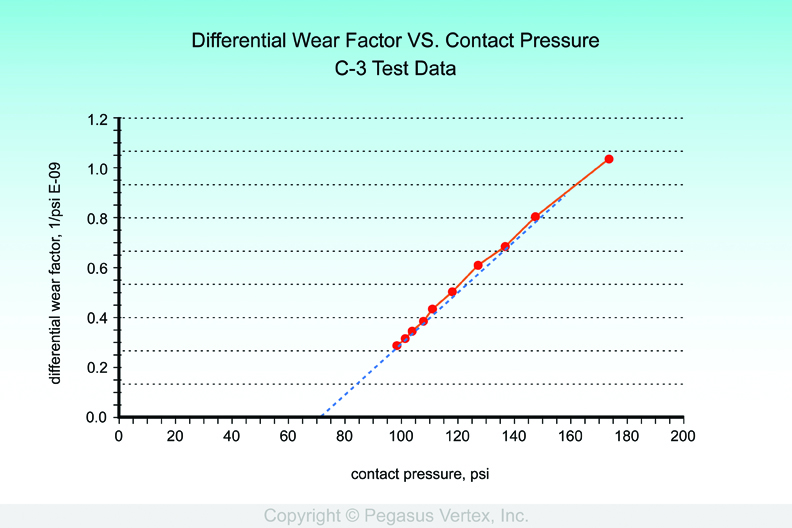
From the relation of wear groove volume vs. work function, the differential wear factor ( the slope of the curve shown in Figure 1) as a function of contact pressure, and shown in Figure 2, can be determined.

Figure 2: Differential Wear Factor vs. contact pressure.

Figure 2: Differential Wear Factor vs. contact pressure.

Figure 2 clearly shows that the differential wear factor, which is the rate of casing wear, intersects the horizontal axis at 70.8 psi., and is equal to zero for contact pressures less than this value. The value (70.8, 0) is the end of the curve, and not just its intersection with the horizontal axis.

The contact pressure threshold of any casing wear system can be determined from the casing wear test data and used to establish the wear groove depth limit for this same system where the geometry differs from that used in the casing wear test. Thus, wear groove depth limits can be estimated for field operations.

If the contact pressure threshold is less than 80 psi, the wear groove depth limit will probably be greater than the thickness of the casing wall. This is the case for most tool joint/casing/drilling fluid combinations.

Some of the proprietary hardbanding samples that have been tested against N –80 casing running in water based mud have exhibited contact pressure thresholds of as much as 200 psi. and wear groove depth limits, under test conditions, of 0.02 inches.

I have not seen quantitative field data confirming the results obtainable using proprietary hardbanding materials , but the continued sales of these products is an indication that the operators are convinced that they do significantly reduce casing wear.

Software: Drilling Engineers’ Eyes

Oil well drilling is one of the most fascinating engineering collaborations I have ever come across. It requires efforts from drill bits, tubulars, motors, mud and the list goes on. Most impressively, all of the drilling processes take place under the ground, probably tens of thousand of feet, maybe horizontally, away from the rig.

To keep drilling operations under control, people have developed many technologies that incorporate electronic, magnetic, and radioactive methods in order to understand the formation and downhole conditions.

The following picture shows a giant, floating iceberg. For a typical iceberg, only 10% of its mass is visible above the water. The remaining 90% is immersed in the deep blue.

It is difficult to estimate its underwater shape; hence, we say “tip of iceberg“ meaning the starting sign of problem.

Similar situations exist on rig floors. Drillers have limited information, which include hook load, surface torque, etc. However, they do not know the axial force along the string, whether the pipe is buckled or not, or if the torque on the pipe connection exceeds the makeup limit. Experienced drillers may sense the downhole problems through the combination of brake vibration, noise or pump pressure, etc., but what we need is something to bridge the gap between what we can see and what we cannot see.

Drilling software servers as this bridge!

Over the past 20 years, drilling engineering software has become an indispensable engineering tool in design phases, real-time monitoring and post job analyses. Using known operation parameters such as ROP, RMP, mud weight, drilling string configuration and well path trajectory, software like TADPRO can predict pipe buckling, hook load, surface torque, etc.

In other words, software is becoming drilling engineers’ eyes. Equipped with software, we can not only understand what we see (why certain hookload, surface torque), but also see the otherwise invisible happenings.

Do you have “eyes“ for your next well?

Casing Wear Series - 8: Contact Pressure Threshold (Part 1)

If the casing wear groove depth limit is to be regarded as a `real world’ quantity, and not just a`mathematical peculiarity’, two things are required.

1. Experimental verification of the wear groove limit, and

2. A reasonable explanation for the existence of this casing wear groove depth limit.

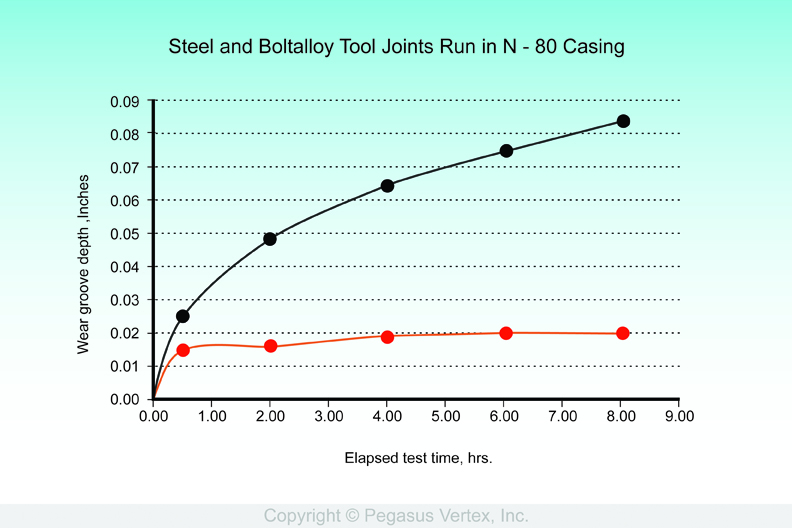
An example showing (1) the existence of the casing wear groove depth limit and (2) the effect of tool joint hardbanding (Boltalloy) on casing wear depth is presented in Figure 1.

The upper curve represents the casing wear test data from Test # C – 3. In this test, the casing was 9 5/8 inch, 47 ppf N – 80: The tool joint was fabricated from AISI 4145 steel: and the drilling fluid was a 10 ppg. Water based mud containing 7 volume % Clemtex # 5 sand. The casing wear groove depth at the end of this 8 hour test was 0.081 inches.

The lower plot, labeled `BOLTALLOY’ , represents test data from a system which differs from that of the C – 3 test only in the metallurgy of the tool joint. The tool joint was hardbanded with a proprietary alloy. The depth of the casing wear groove was 0.02 inches at the end of this 8 hour casing wear test.

Use of the proprietary hardbanding reduced the casing wear groove depth in the N – 80 casing to a maximum depth limit of 0.02 inch. This is in contrast to the 0.1739 depth limit predicted for the N – 80 casing in the presence of the unhardbanded AISI 4145 steel tool joint.

The time required to reach 90 % of the wear groove depth limit for the BOLTALLOY test was 1.56 hours.

These results are similar to many other results that have been obtained during the DEA 42 Casing Wear Program, and they confirm the existence of the casing wear groove limit. It is a physical reality.

Casing Wear Depth Limit

Figure 1: Casing Wear Depth Limit

NOTE: Observations and conclusions regarding the performance of casing wear systems (which consist of (1) casing, (2) tool joint, (3) drilling fluid, and (4) operating conditions) are based on mathematical analyses of the statistical curve fit to the casing wear test data.

A Presentation on Centralizer Placement is Being Made

I am preparing the presentation for the upcoming 2012 SPE Deepwater Drilling & Completions Conference and Exhibition which will be held at Moody Gardens Hotel, June 20-21. My topic is how to optimize the centralizer placement.

I am a semi-expert in this area, but I reserved one month to make the presentation. According to Nancy Duarte, the author of “slide:ology – the Art and Science of Creating Great Presentations,” the estimated time for developing an hour-long presentation of 30 slides is between 36-90 hours! Inspired by her book and other experts in communication, I made up my mind to try a totally new approach using some fresh, yet not-so-popular rules such as:

  • No more than 6 words on a slide
  • No more cheesy images
  • No font size less than 30
  • No dissolves, spins, or other transitions
  • No built-in theme
  • Make ‘em laugh
  • More fun

A few years ago, I bought a book titled “Presentation Zen: Simples Ideas on Presentation Design and Delivery” by Garr Reynolds. Garr is an internationally acclaimed communications expert. You can easily find his videos on YouTube, too. That book was such an eye-opener for me. I was literally woken up from my old way of making presentations. I suggest every engineer get the book so we may improve our presentation skills.

It is hard enough to be an engineer. Now, we are required to explain our findings in a concise and artistic style. Most engineers use PowerPoint software. One would think that having all the raw materials ready is 80% of the job and it would just be a matter of time to put it in the format of slides. But if one really wants to make a difference and let his/her hard work shine, then putting one’s heart and mind into the slide creation will pay off. After all, it is the finish line of a 36-90 hour-long marathon!

Abraham Lincoln once said, “Nearly all men can stand adversity, but if you want to test a man’s character, give him power.” Nancy Duarte cutely changed the last word and it became: “… give him PowerPoint.”

My presentation at the SPE Deepwater Conference will be on Thursday, June 21st, Session 14 (Casing and Tubulars), in Hall A3 at 2:30pm. The paper number is SPE 150345.

I welcome you to join me and check my character.

You Do Not See What I See

While in a casual conversation, a friend of mine made above statement. No, she was not mad at me or we were in an heated argument. She just pointed out one of the reasons that many of us do not reach agreement. And on this, I agree with her.

I am not color blind, but my left eye is near sighted and my right eye far sighted. I guess I could not see very well in the middle range. We used to have a PhD colleague in our company, who was red/green color blinded. He occasionally asked other developers which color was the line in our CEMPRO software. His question amazed me: "How come one can not see something so obvious?" At the same time, his question led to a feature in our software: an option to use symbol, in addition to color, to differentiate lines.

CEMPRO - mud displacement model

CEMPRO - mud displacement model

All of us grow up with different culture, education and experience, which either enhance or limit our ability of seeing the world.

While an experienced drilling engineer can sense the looming problem of well control when he/she sees the increasing pit gain or changing pressure, a green-hand will not be able to associate what he sees with what is coming.

It is hard enough not to be able to "see" things sometime, leave alone that we occasionally, consciously or unconsciously, choose not to "see", for pride, ego or wishful thinking.

For drilling operation, ideally, operator and service companies should be on the same page or see the same thing in spite of their respective motivations. Within an engineering team, if all the members understand and agree with each other, decisions become easy.

Drilling software is such an enabling technology, which can elevate the entry level engineers and magnify or amplify the experience of seasoned ones. It makes the drilling design and analysis more transparent and visible to everyone. It reduces the risk by letting us see better and deeper.

Casing Wear Series - 7: Casing Wear Groove Depth Limit

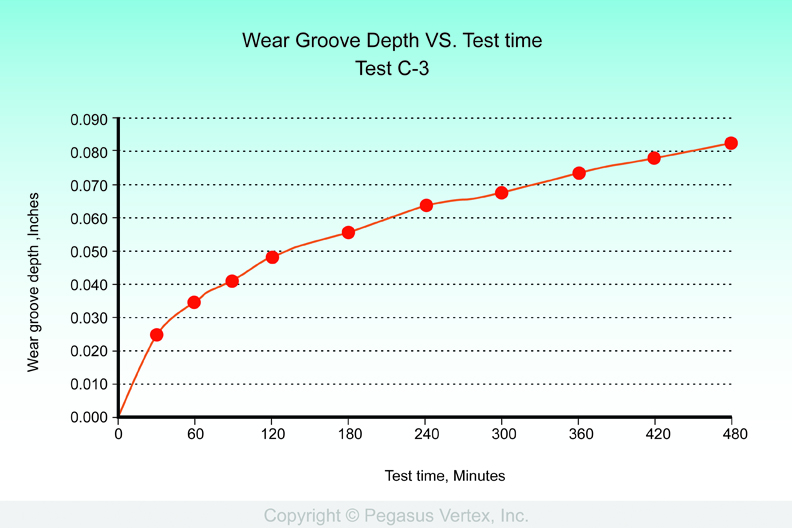
Plotting the depth of the casing wear groove during the 8 hour casing wear test results in a plot as shown in Figure 1. These results are from casing wear test C-3. In this test, the casing sample was a piece of 9 5/8 inch, 47 lb/ft, N-80 casing. The tool joint was fabricated from AISI 4145 steel. And the drilling fluid was a 10 ppg, water-based mud containing 7 % by volume Clemtex #5 sand.

Figure 1: Wear groove depth vs. elapsed test time plot

Figure 1: Wear groove depth vs. elapsed test time plot

This plot is a description of the performance of a casing wear system under the particular set of operating conditions imposed during the casing wear test. It describes the performance of the casing wear system under the operating conditions of the casing wear test. It does not explain anything!

An empirical curve fit to this data, which is the best representative of all 450 or so casing wear tests, is a function, shown in Equation 1, which is primarily exponential with a bit of a power law element added.

Equation 1

Equation 1

Where h = wear groove depth, inches

D, E, and F are all positive constants determined by the least squares fit to the test data.

t = elapsed test time, hours.

There is a very important and significant consequence of this result: As time, t, increases, the wear depth, h, approaches asymptotically the value D.

The Wear groove depth does not increase beyond D.

And the test time, t90, required to achieve 90% of this wear depth limit is given by Equation 2.

Equation 2

Equation 2

For test C-3, D, (the wear groove depth limit) = 0.17154 inches, and t90, (the test time required to reach 90% of this depth limit) = 98.32 hours.

In those cases where D, the casing wear depth limit, is greater than the wall thickness of the casing, (0.472 inch for the casing sample in test # C-3 ), it can be assumed that the casing wear groove depth will easily reduce casing wall thickness below which required to maintain adequate burst resistance.

But, if a tool joint hardbanding material can be found for which the value of D from the test data is on the order of 0.02 to 0.03 inch, you have a valuable discovery.

Before marketing any such discovery, hardbanding wear rate, initial cost, and replacement cost must all be evaluated. Economics is a major factor in the development and application of casing friendly devices.

If such small casing wear groove depth limits are a physical reality, the wear depth limit can be a more important property of a hardbanding material than the wear factor, which is based on the wear volume determined at the end of an 8 hour laboratory test.

We need to determine if this concept is real or just a mathematical peculiarity of the statistical curve fit procedure.

This will be our next discussion topic.

Casing Wear Series - 6: Some Pictures

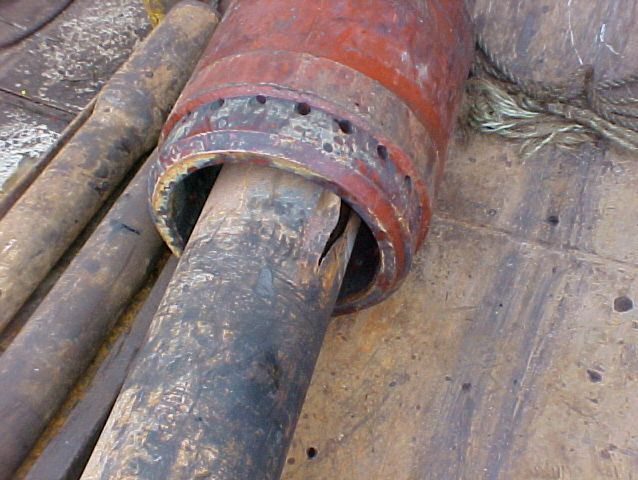
Not many examples of casing wear are retrieved from field operations. Pulling casing is expensive, and if the damage can be nullified by running and cementing an intermediate casing liner, rather than pulling the damaged string, that will probably be done. As ever, if there are two possible solutions to a field operational problem, the least expensive one will be implemented.

Figure 1: Burst Liner

Figure 1: Burst Liner

Figure 1 shows a typical liner failure. Wear is greatest at the top of the liner, and decreases as you progress downward. If wear continues long enough, the liner wall thickness is reduced to the point where the burst strength of the thinned wall is less than the internal pressure. The resulting burst is a tapered opening, largest at the top of the liner, tapering downward.

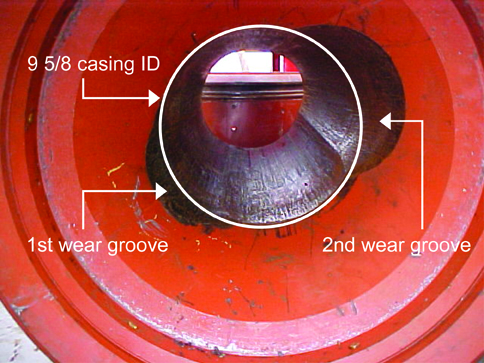
Figure 2 shows two wear grooves in a liner hanger wear bushing. After inspection revealed the first wear groove, the bushing was rotated 180 degrees before being reinstalled, thus resulting in the formation of the second wear groove.

Casing or riser wear occurs where the borehole either changes direction (dogleg or a flex joint) or diameter (top of a liner).

Dogleg severity can be determined from a directional survey of the well. With dogleg severity and drillstring tension, the lateral load on the casing can be calculated. This allows casing wear as a function of well depth to be calculated.

Where we deal with a change of well diameter - such as at the top of a liner - we have no reliable way to calculate lateral load. Therefore, we assume the worst and install wear bushings at the top of liners.

Figure 2 demonstrates the value of a wear bushing. Better the bushing should wear, rather than the top of the liner hanger.

Figure 2: Wear Groove in Liner Hanger

Figure 2: Wear Groove in Liner Hanger


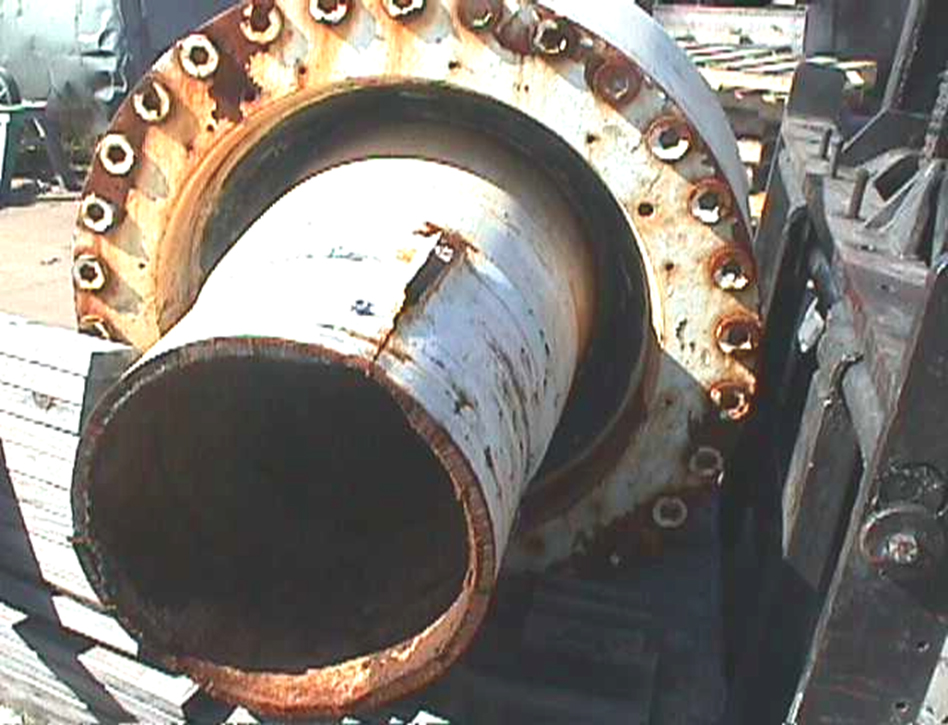
Figure 3 shows the split resulting from burst failure at the top of a flex joint. This failure occurred in a section weakened by internal wear. Internal view of this split is shown in Figure 4.

Figure 3: Split at the top of Flex Joint

Figure 3: Split at the top of Flex Joint

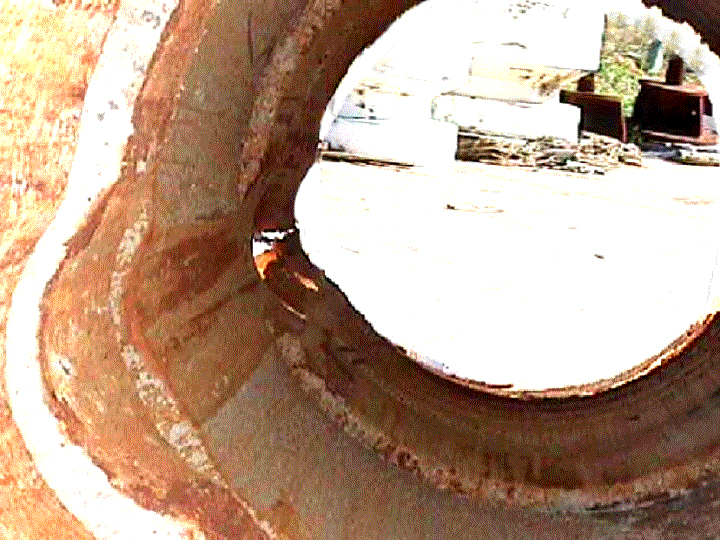
Figure 4 is a view of the split shown in Figure 3, looking from the inside out.

Figure 4: Another View of the Failed Flex Joint

Figure 4: Another View of the Failed Flex Joint

Figure 5: Wear Groove in Upper Element of Flex Joint

Figure 5: Wear Groove in Upper Element of Flex Joint

Secrets of the Ritz-Carton

Victoria Secret is not really secret, but the Ritz-Carlton Seoul hotel, which I stayed during my recent trip to Korea, does have secret.

After the long flight from San Francisco, I arrived at Incheon. Another hour of limo, I was in Gangnam business district of Seoul. As soon as I stepped into the 5-star hotel, a gentleman greeted me: "Good evening! Mr. Liu?" When I was expecting something like "…, Check in?" Dale Carnegie once said: "A person's name is the most beautiful sound in the world to them.” And I heard that sound at the farthest place away from home. Skipping the front desk, with a folder in his hand, the same staff even led me directly into my room, which, to my pleasant surprise, was a suite. They upgraded for me with fruits on coffee table, and greeting card from general manager.

During the next couple days, whenever I made phone call to the front desk, or talked with various staff, I always got greeted with my name. One day, I consulted with a lady in Concierge about trip to JeJu Island, she patiently explained to me the attractions and said that she would print some reading material and send to my room. She then asked me my room number. I answered. She immediately said: "Oh, Mr. Liu?" Looking at her puzzled,
I asked: "How can you guys and girls remember guest's name?" She smiled like a flower:
"It is a secret of the Ritz-Carlton!" She then mentioned that I made reservation through America Express "Luxury Hotel and Resort" program. That might had something to do with it. Regardless, it is a nice secret many wish to have.

Effects of secrets are more powerful than secrets themselves, as illustrated by magicians. I may never find many secrets, but I do enjoy magician shows and my stay in Seoul.

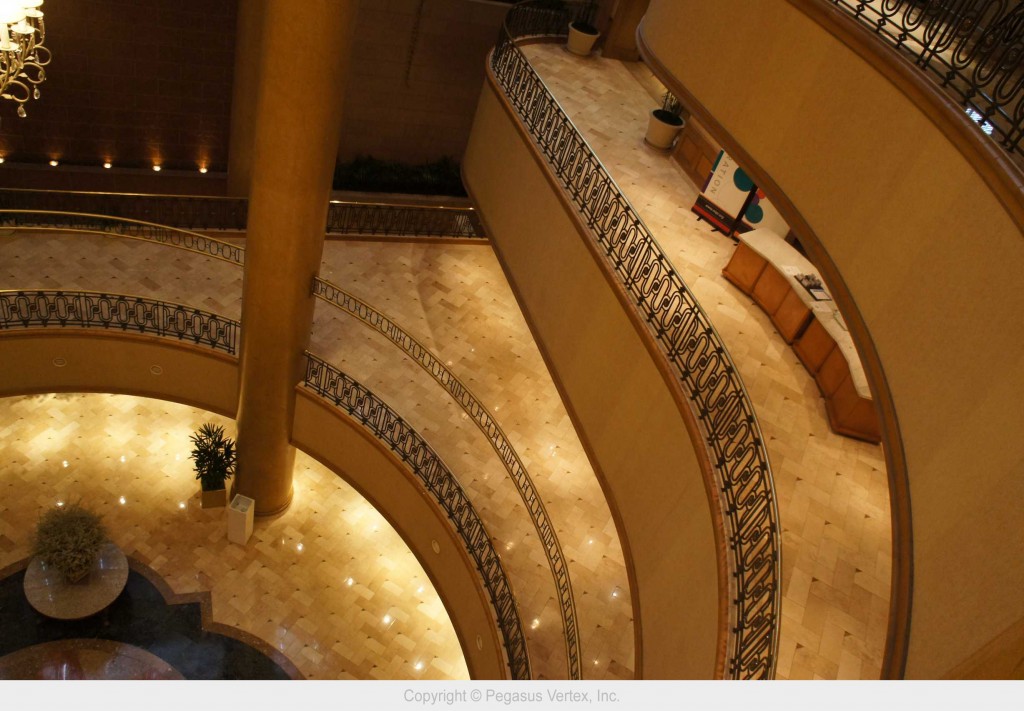
Ritz-Carlton - 1

Ritz-Carlton - 1


Ritz-Carlton - 2

Ritz-Carlton - 2